
Prompt Template – Exercise 2

Prompt Template Exercise 2: AI-Driven Email Automation Using a Flex Prompt Template
This lesson walks through a step-by-step build-along for automating the introduction email process using two Salesforce tools: Prompt Builder and a Screen Flow. The Agentforce toolset works like a system of bi-directional puzzle pieces—different elements can pass information to each other in both directions.
For example, when building a prompt template, you can inject data from a Flow into the prompt template as a resource. The reverse is also true: you can build a Flow and use the Action element to retrieve AI-generated data from a prompt template and feed it back into the Flow. That’s exactly what we’ll be doing in this exercise.
What You’ll Learn
- Build a structured prompt template in Salesforce that synthesizes key contact details into a compelling introduction email.
- Integrate AI-generated emails into a Salesforce Screen Flow for user interaction, review, and customization.
- Deploy this solution for SaaS United to streamline the introduction email process.
Business Need & Problem Statement
SaaS United operates a global SaaS network, connecting professionals, investors, and strategic partners. The Business Development (BD) team is responsible for introducing key contacts within the SaaS ecosystem, fostering relationships, and driving partnerships. Currently, BD team members manually:
- Review biographies of two individuals
- Draft personalized email introductions
- Format and send emails through Salesforce or Gmail
- Log the interaction in Salesforce
This manual process is inefficient, requiring an estimated 10-15 minutes per email. Given that each BD rep sends 10-20 introductions per day, this results in 2-5 hours of lost productivity per rep daily—time that could be spent on higher-value relationship-building activities.
Additionally, the lack of standardization in email structure and tone creates inconsistencies in professional introductions. SaaS United needs an AI-driven automation solution to:
- Reduce manual effort
- Ensure email quality and consistency
- Enable reps to focus on strategic business conversations
To address these challenges, we will build an AI-driven email automation solution using Prompt Builder and Screen Flows. This solution will automatically generate personalized emails based on the biographies of two contacts. By integrating a flexible prompt template with a screen flow, users will be able to:
- Input contact details
- Retrieve AI-generated email drafts
- Review and edit the draft within the flow
- Send the email with minimal effort
This automation significantly reduces manual effort while standardizing a core business process.
Step 1: Creating a Prompt Template in Salesforce
To build an AI-driven email automation solution, the first step is to create a structured Prompt Template in Salesforce. This template will dynamically generate email introductions based on the biographies of two contacts.
Step 1: Setting Up the Prompt Template
- Navigate to Salesforce Prompt Builder:
- Go to Setup and search for Prompt Builder.
- Click New Prompt Template.
Step 2: Choose the Prompt Type
- Select Flex Prompt Template from the available options.
- Why Flex Prompt?
- Allows multiple input sources (up to 5 objects).
- Provides flexibility for different use cases.
- Customizable output format compared to predefined templates.
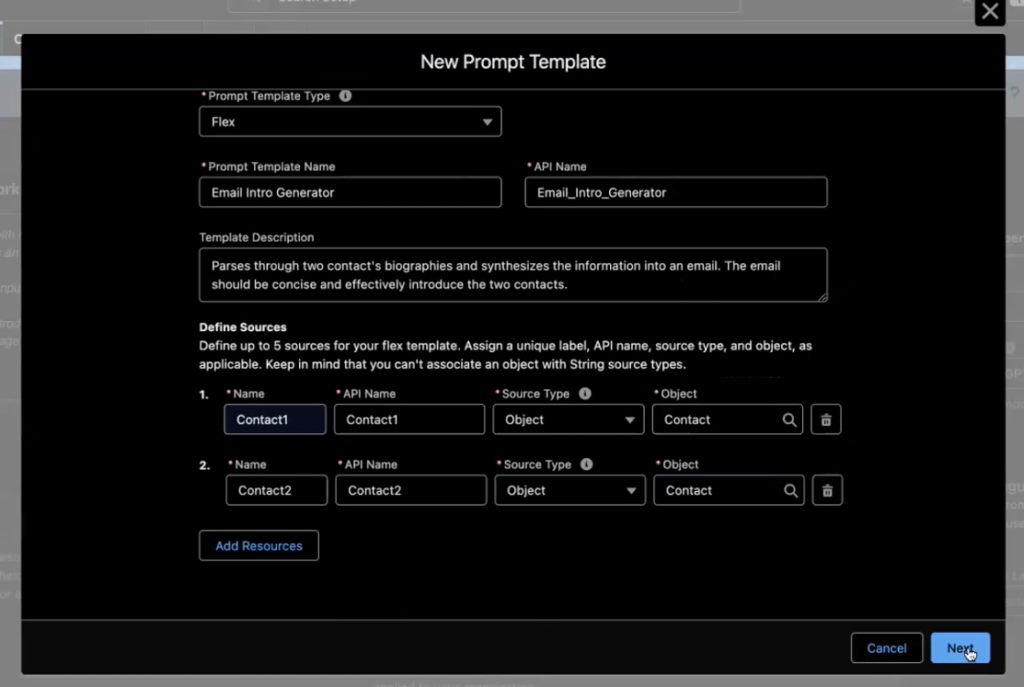
Step 3: Set Up Prompt Name and Description
- Prompt Name: Email Intro Generator
- Description:
This prompt parses the biographies of two contacts, synthesizes relevant information, and generates a professional yet friendly introduction email.
Step 4: Defining the Data Sources
The Salesforce AI Prompt Builder allows you to pull data from objects or enter free text. In this case, we are pulling two Contact records as inputs.
- Select Input Sources:
- Click on Add Input Source.
- Choose Salesforce Object → Contact.
- Repeat this step to add a second Contact object.
Step 2: Writing and Refining the Prompt in Salesforce
Step 1: Structuring the Prompt
Before writing the actual prompt, it’s important to structure it properly to ensure the AI generates high-quality responses. A well-structured prompt for this exercise will include:
- Introduction – Clearly define what the AI should do.
- Objective – Explain the purpose of the prompt.
- Structure of Response – Specify the expected output format.
- Key Details – Highlight important elements the AI must include.
- Input Information – Define the variables from Salesforce records.
- Example Output – Provide an example of a well-written email.
INTRO:

OBJECTIVE:

INPUT INFO:

STRUCTURE OF RESPONSE:

KEY DETAILS:

EXAMPLE: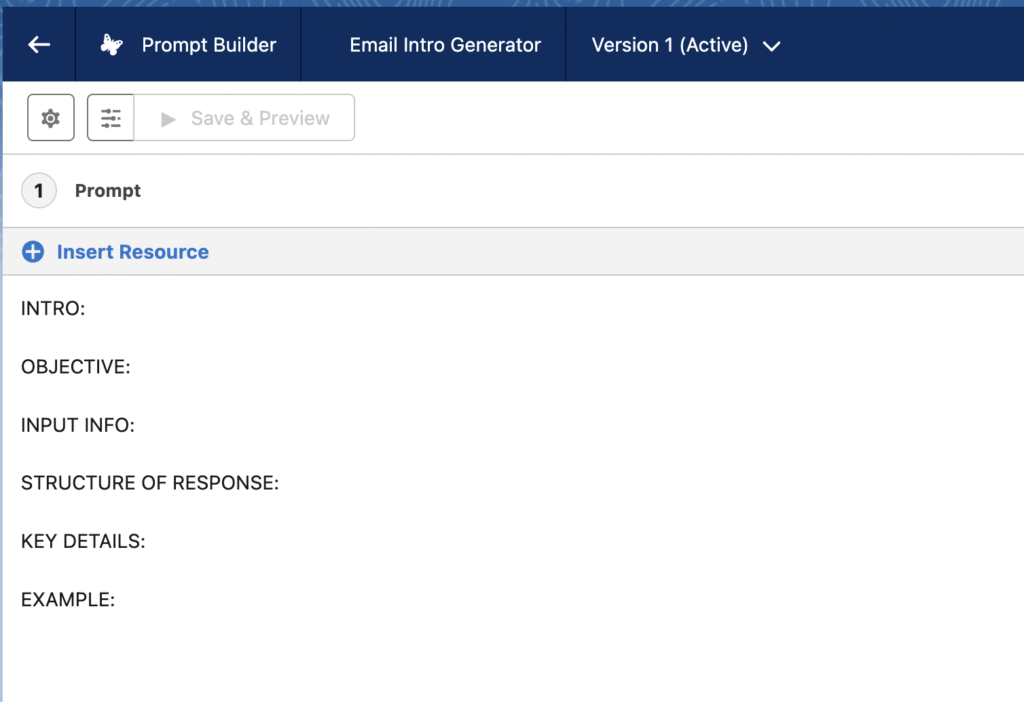
Step 2: Generating a Prompt Using ChatGPT or similar AI Tool for Refinement
To improve the quality of the email output, use ChatGPT to refine the prompt:
- Copy and paste the draft outline above into ChatGPT.
- Add the following instruction:
Utilize this template to create a prompt for Salesforce Prompt Builder that introduces two contacts based on their description field. The email should be concise, professional, signed as SalesCraft AI assistant, and should call for the two individuals to meet.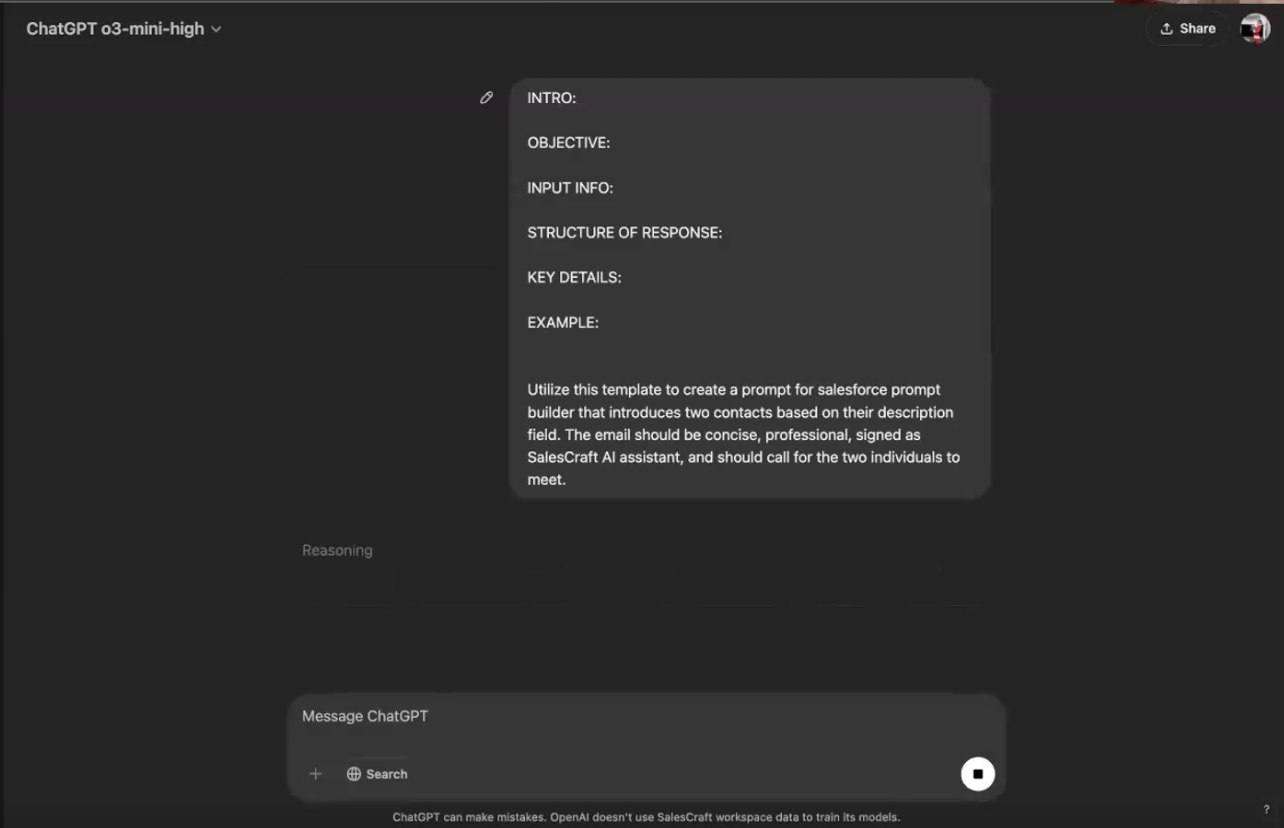
Refining the Prompt with ChatGPT
After generating the initial draft, use ChatGPT to refine the prompt by improving clarity, tone, and structure. Incorporating AI-driven refinements ensures the generated email feels more natural and engaging.
- More natural language flow – Ensure the AI output reads smoothly and conversationally.
- Adjusting tone for better engagement – Tailor the language to make it more inviting and professional.
- Ensuring the prompt avoids redundancy – Streamline the structure to prevent unnecessary repetition.
Step 3: Drafting the Prompt in Prompt Builder
Once you have refined the prompt, it’s time to add it into Prompt Builder. Navigate to the Prompt Writing Area in Prompt Builder and paste the refined text.
Next, replace the placeholder input fields with Salesforce record variables:
Contact 1:
FIRST NAME: {!$Input:Contact1.FirstName}
BIO: {!$Input:Contact1.Description}

Contact 2:
FIRST NAME: {!$Input:Contact2.FirstName}
BIO: {!$Input:Contact2.Description}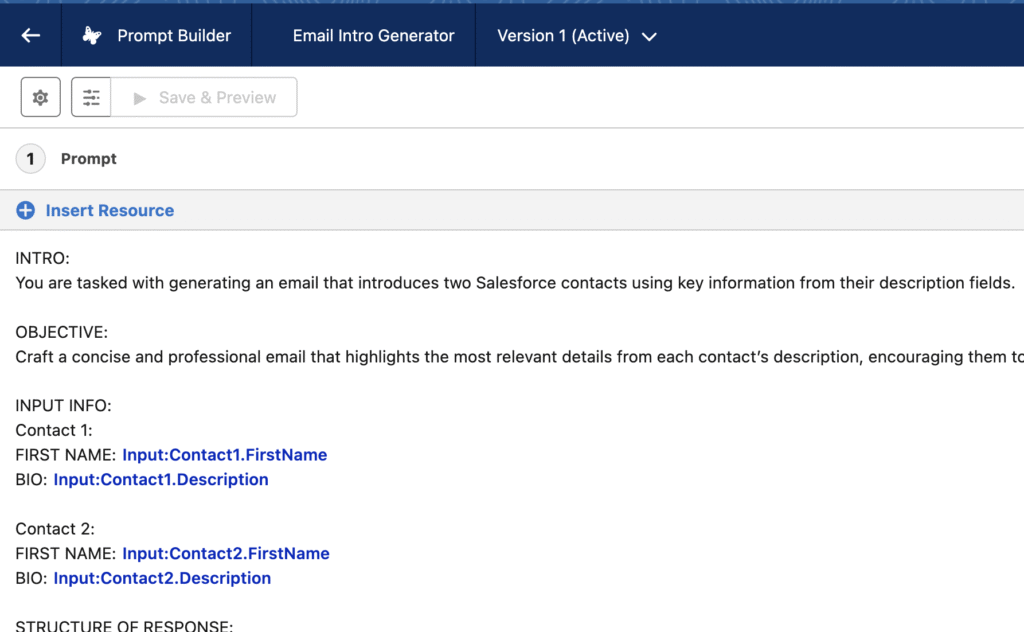
Step 4: Finalizing the Prompt
Now the prompt has been structured, refined, and tested, finalize it with clear objectives and formatting:
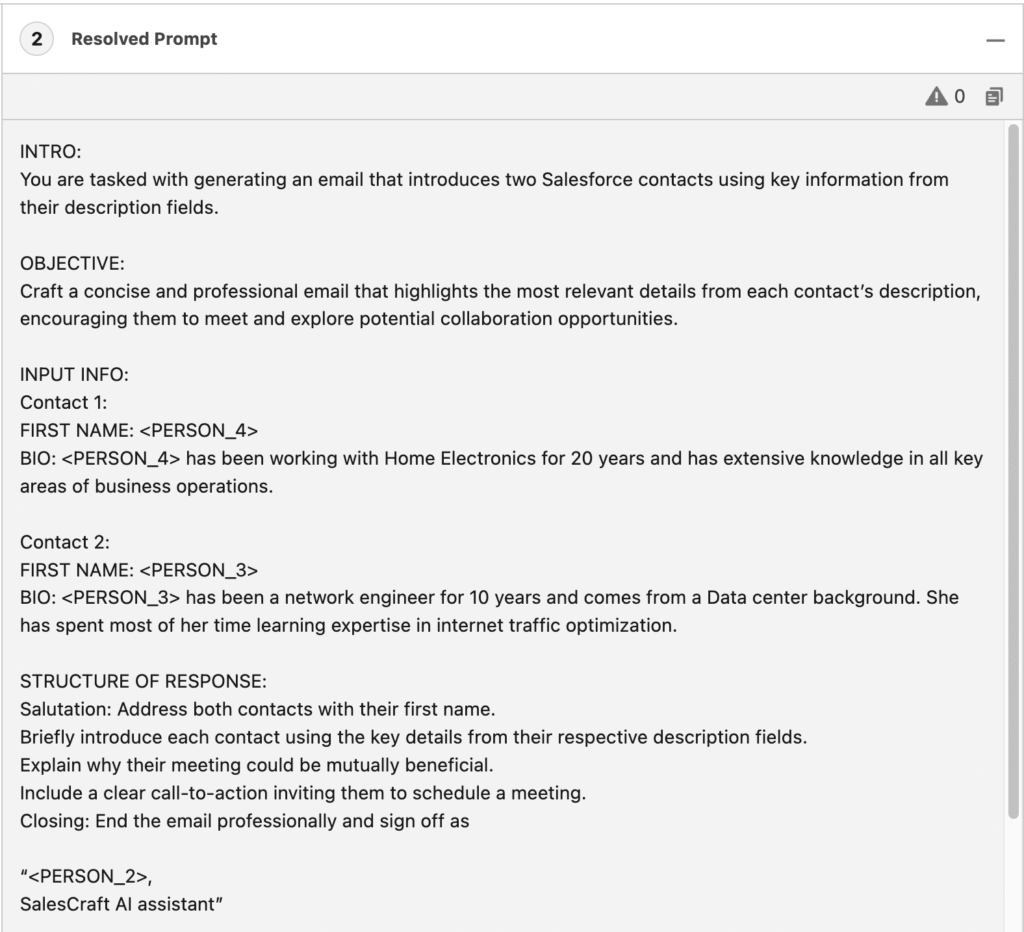
INTRO:
You are tasked with generating an email that introduces two Salesforce contacts using key information from their description fields.

OBJECTIVE:
Craft a concise and professional email that highlights the most relevant details from each contact’s description, encouraging them to meet and explore potential collaboration opportunities.

INPUT INFO:
Contact 1:
FIRST NAME: {!$Input:Contact1.FirstName}
BIO: {!$Input:Contact1.Description}

Contact 2:
FIRST NAME: {!$Input:Contact2.FirstName}
BIO: {!$Input:Contact2.Description}

STRUCTURE OF RESPONSE:
Salutation: Address both contacts with their first name.
Briefly introduce each contact using the key details from their respective description fields.
Explain why their meeting could be mutually beneficial.
Include a clear call-to-action inviting them to schedule a meeting.
Closing: End the email professionally and sign off as

“Luna Lovgarden,
SalesCraft AI assistant”

KEY DETAILS:
The email should be concise and maintain a professional tone throughout.
It must incorporate specific details from each contact’s description to personalize the introduction.
Ensure a direct call-to-action is included, urging them to meet.

EXAMPLE:
Dear Jane and John,

I hope this message finds you both well. I’m excited to introduce you to one another, as I believe your unique expertise could spark some truly innovative opportunities.

Jane, your impressive track record as a marketing strategist—with your creative leadership in digital campaigns and brand management—continues to set industry benchmarks.

John, your robust background in sales and business development, coupled with a consistent record of driving revenue growth, makes you a powerhouse in the field.

I’m confident that a conversation between you could lead to a dynamic collaboration. Please consider scheduling a meeting at your earliest convenience to explore potential synergies.

Best,
Luna Lovgarden
SalesCraft AI assistant
Step 3: Testing the Prompt in Prompt Builder
Once the prompt template has been created, it’s time to test and refine it to ensure it produces high-quality email introductions. We’ll preview generated responses using real or sample data.
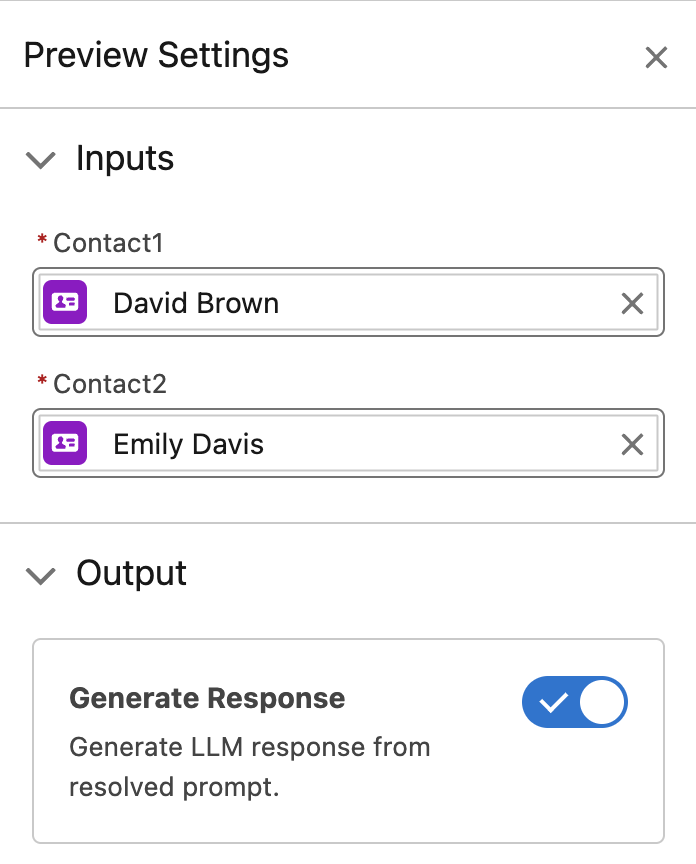
Step 1: Previewing the Prompt
- Use Preview Settings in Prompt Builder.
- Select two contacts that have sample information in the preview section.
- For example the test contacts might look like:
Contact 1: First Name: Alex
Description: “Alex is a software engineer at XYZ Tech specializing in AI-driven applications.”
Contact 2: First Name: Jamie
Description: “Jamie is a product manager at ABC Innovations focused on AI and machine learning strategy.”

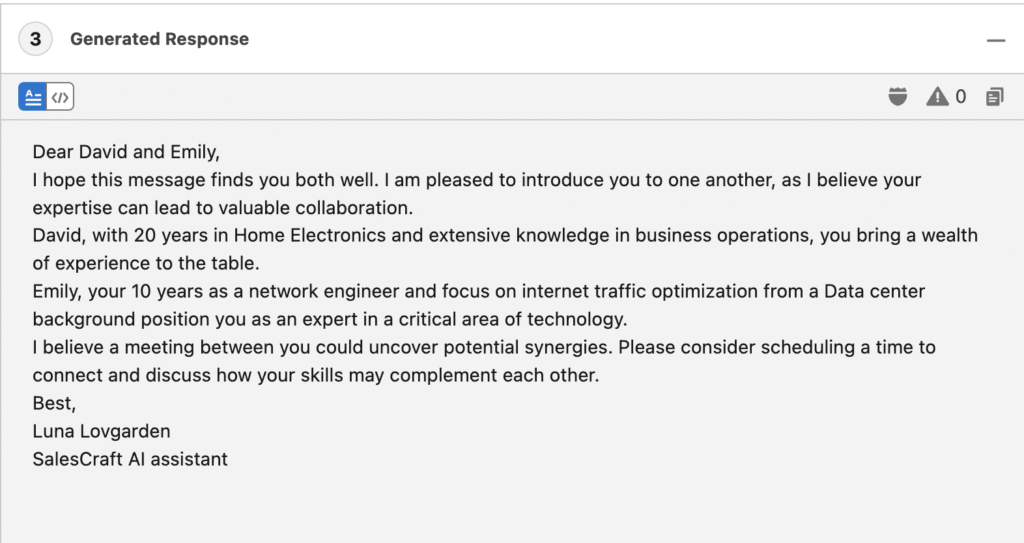
Step 2: Evaluate AI-Generated Email
Once the AI generates the email, carefully review the Resolved Prompt output and the Generated Response for accuracy. Ask yourself:
- Does the email sound natural?
- Are unnecessary details included?
- Is it concise and professional?
Step 4: Finalizing the Prompt
Once satisfied with the AI-generated output, click Activate to make the prompt available for use in Salesforce Flows:
Step 4: Integrating the Prompt into a Salesforce Screen Flow
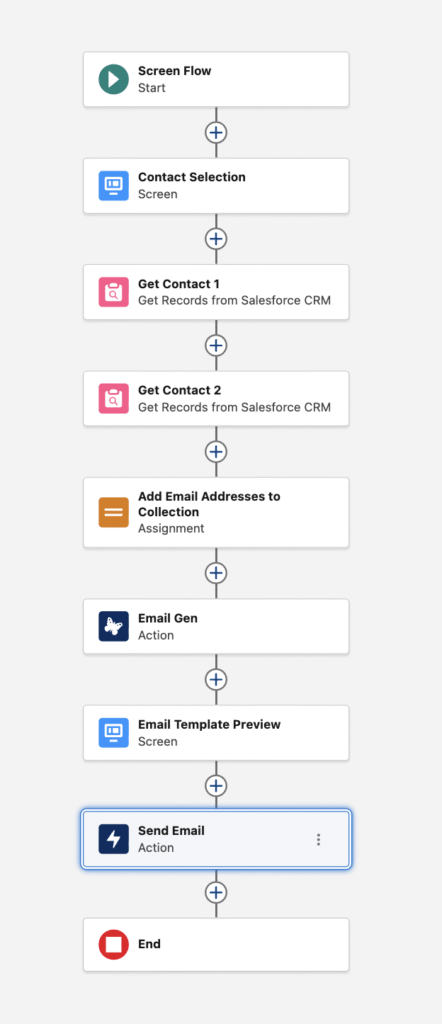
Now that the Prompt Template has been created and tested, the next step is to integrate it into a Salesforce Screen Flow. This will allow users to input contact details, generate the email, review it, and send it directly from the Flow.
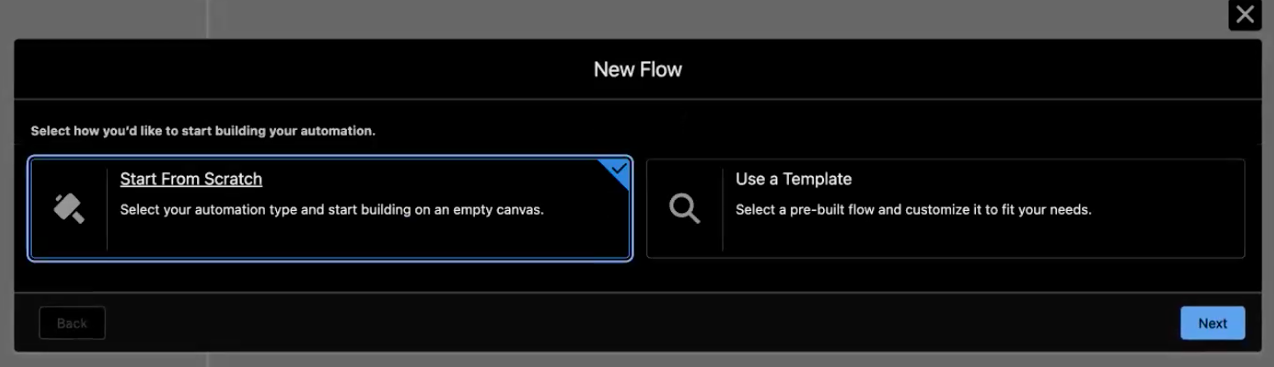
Step 1: Creating a New Screen Flow
- Navigate to Salesforce Flow Builder.
- In Setup, search for Flows.
- Click New Flow.
- Select Start from Scratch.
- Choose Screen Flow (since we want users to interact with the Flow).
- Click Create.
Step 2: Adding a Screen Element for Contact Selection
- Add a Screen Element onto the Flow canvas.
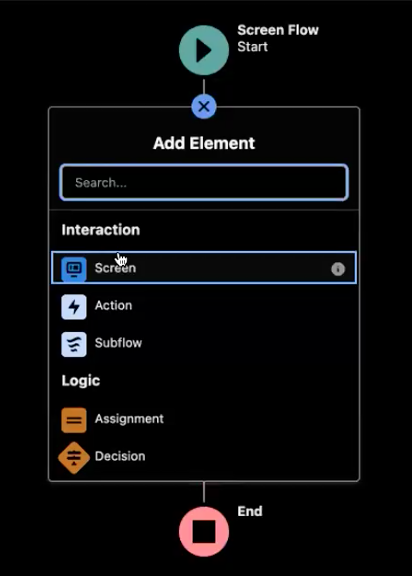
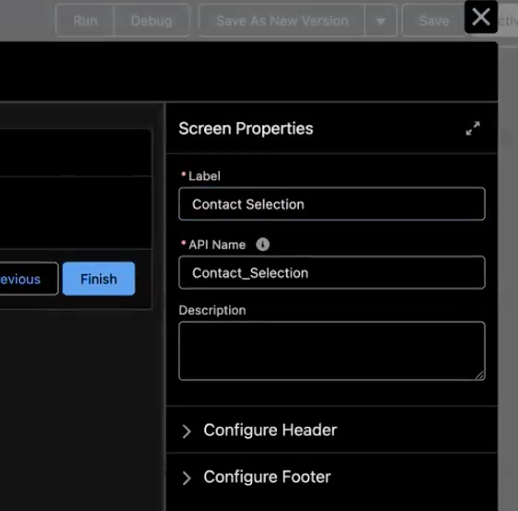
- Name the screen: Contact Selection.
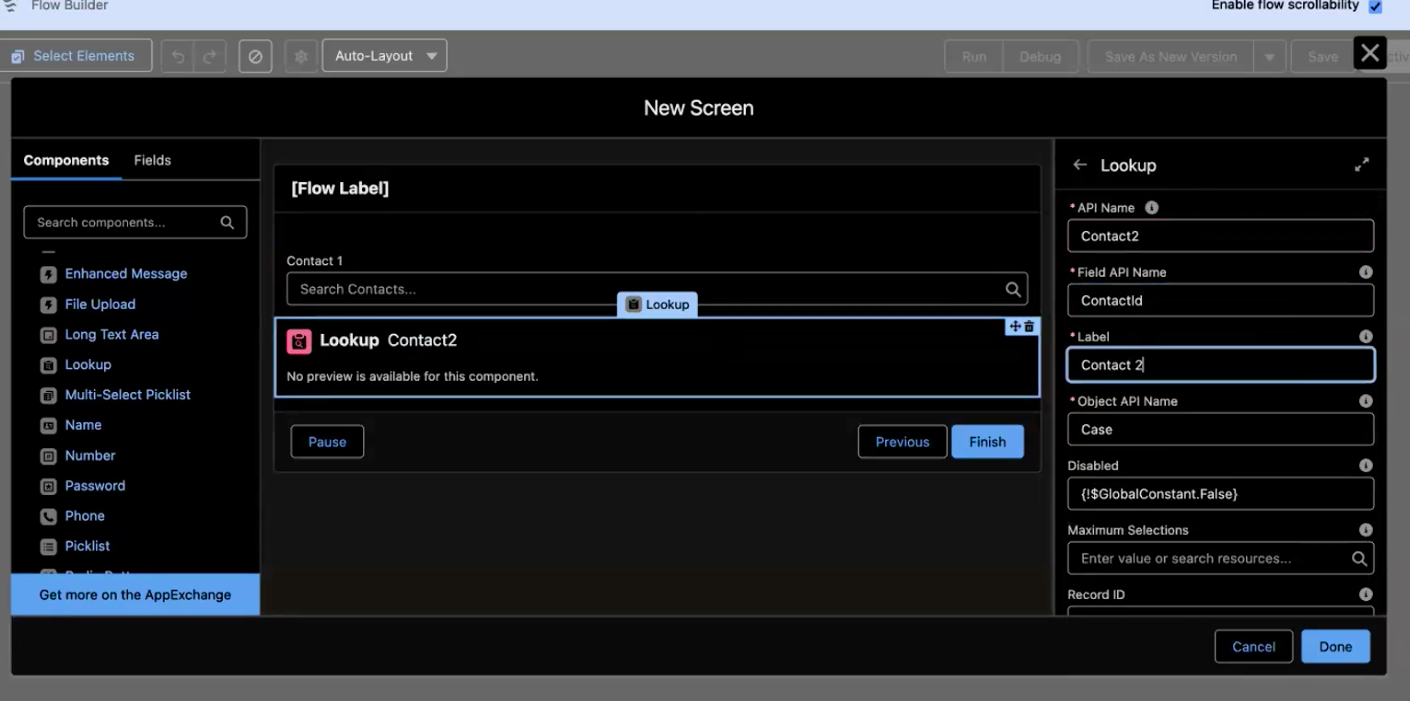
- Add two Lookup Components to the screen element:
- Contact 1: Select Contact Object as the lookup source.
- Contact 2: Select Contact Object as the lookup source.
- Populate the values needed for each lookup component:
- Click Done
Understanding the Object API Name Selection
Pay special attention to the Object API Name field in the last screenshot. Why are we selecting Case here? Aren’t we working on the Contact?
Well… yes, we are, but this is a lookup field. We need to lookup a contact. Salesforce needs a base record from which to perform the lookup.
Really, any object that has a lookup to the contact record would work here. We’ve just arbitrarily chosen Case.
Step 3: Retrieving Contact Records
- Since the Screen Component only captures Contact IDs, we need to retrieve the full contact details.
- Add a Get Records element onto the Flow canvas.
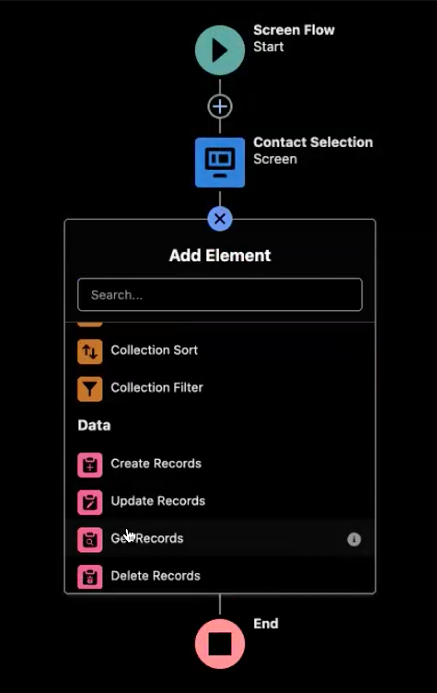
- Name it: Get Contact 1.
- For Data Source, select Salesforce Contact Object.
- Set the filter to retrieve the record where the ID matches the Contact 1 selected in the previous step.
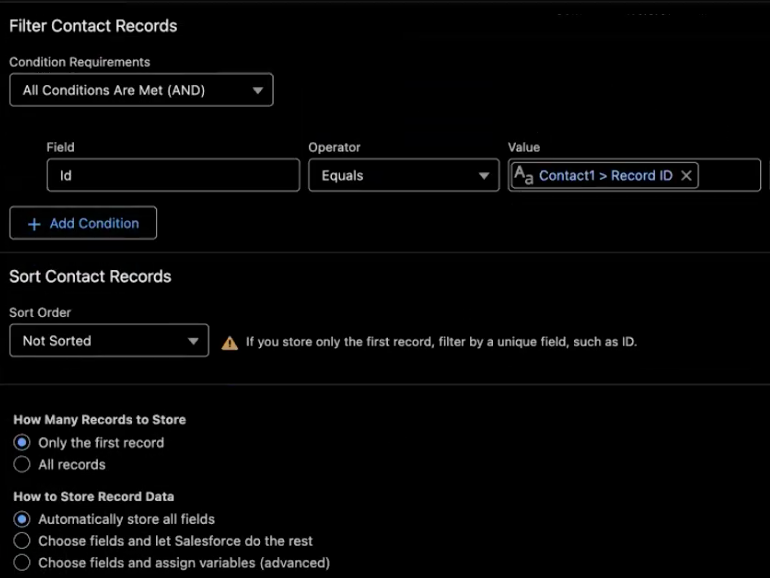
- Choose Only the First Record.
- Repeat this process to create a Get Contact 2 element.
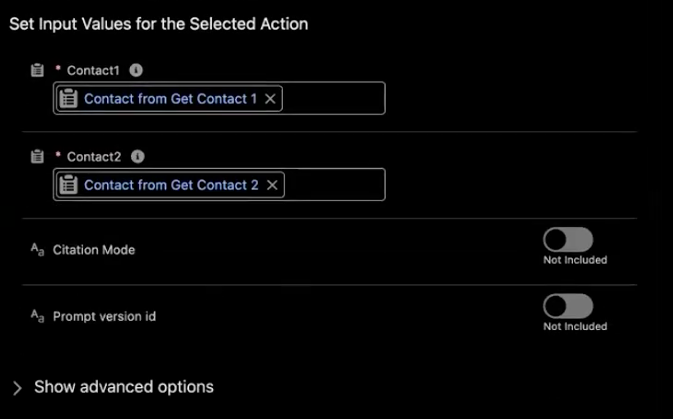
Step 4: Calling the AI Prompt in the Flow
- Now that we have the contact data, we will use the Prompt Template created earlier.
- Drag an Action element onto the Flow canvas.
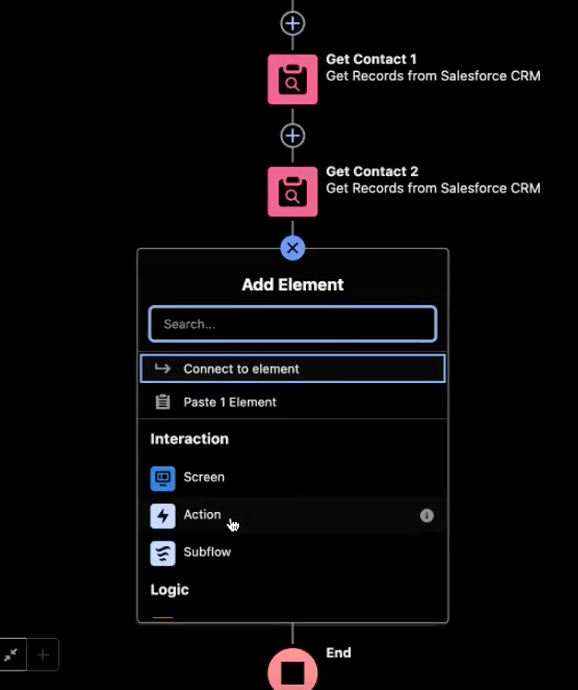
- Search for the name of your prompt template: Email Intro Generator.
- Select the Email Intro Generator Prompt. (the one we built earlier).
- Add the label: Email Gen.
- Map input variables as the contacts retrieved from the previous Get Records actions.
Step 5: Displaying the AI-Generated Email
Now that the AI-generated email has been created in Prompt Builder, the next step is to display it within the Salesforce Screen Flow for review and potential edits before sending.
Step 1: Adding a Screen Element for Email Preview
- Add a Screen Element onto the Flow canvas.
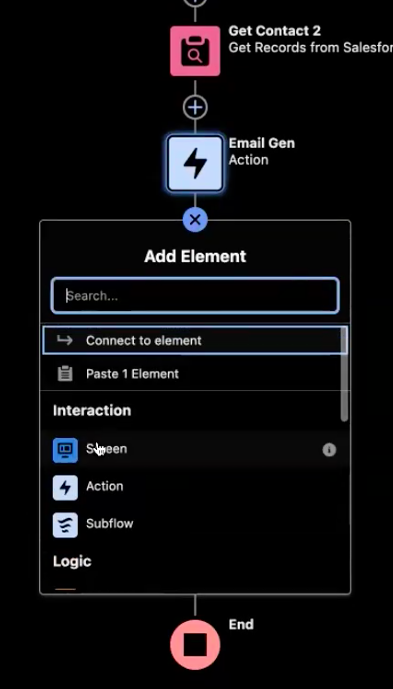
- Name it: Email Template Preview.
- Add a Long Text Area component which will give users the ability to view and edit email text. Label it as Edit Generated Email.
- In the options pane, set the Default Value by selecting a resource. Select Email Gen → Prompt Response which is the the AI-generated email output.
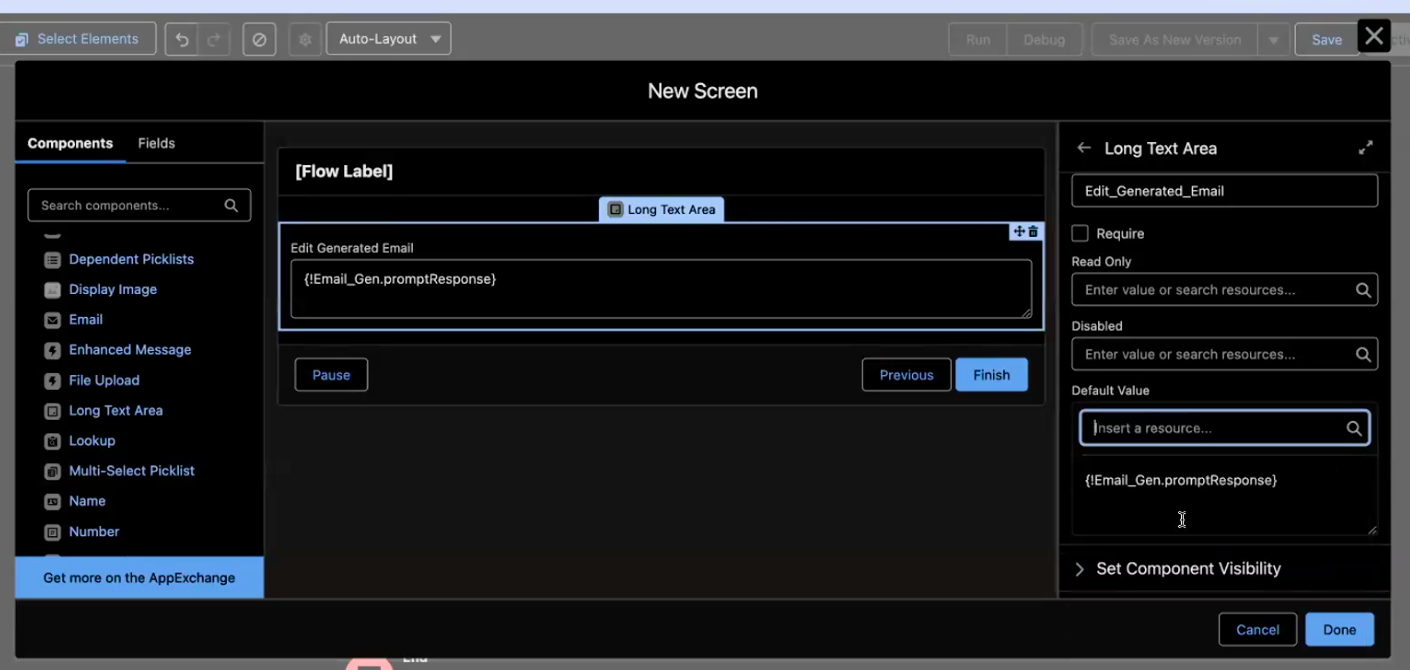
- Click Done.
- At this point go ahead and Save your Flow!
Step 2: Test & Debug
Before finalizing the Flow, it’s essential to test and debug it to ensure everything works as expected.
- Click Save & Debug in Flow Builder.
- Select sample contacts with descriptions.
- Verify that the AI-generated email appears correctly.

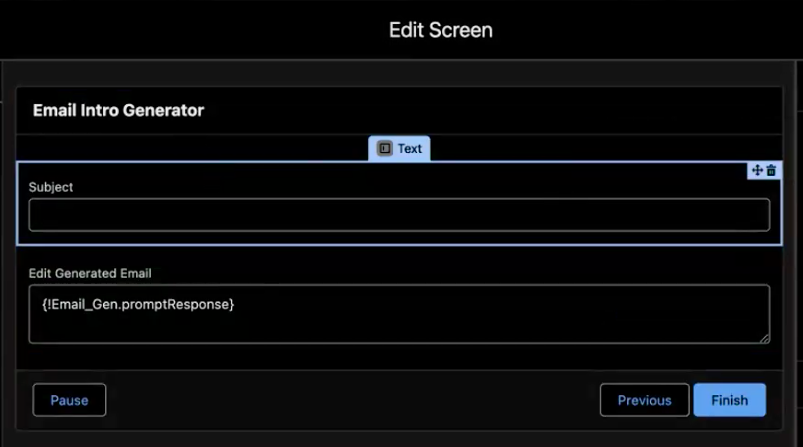
Now that we’ve determined the results from the screen flow are good, we can finish out the process by adding the remaining elements users need on the last screen in the flow.
Back on the last screen element in the flow, add a Text Component above the generated email. Label it as the Subject.
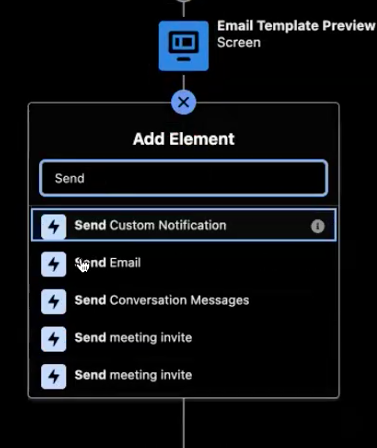
Step 6: Sending the Email
The final step in the automation process is configuring Salesforce to send the AI-generated introduction email. This is done using the Send Email action in Flow Builder.
Step 1: Adding the “Send Email” Action
- Add an Action element onto the flow canvas.
- Search for and select Send Email.
Step 2: Configuring Email Parameters
- Name: Send Email
- Subject: Select the resource
Screen -> Email Template Preview -> Subject(the user-edited subject). - Body: Select the resource
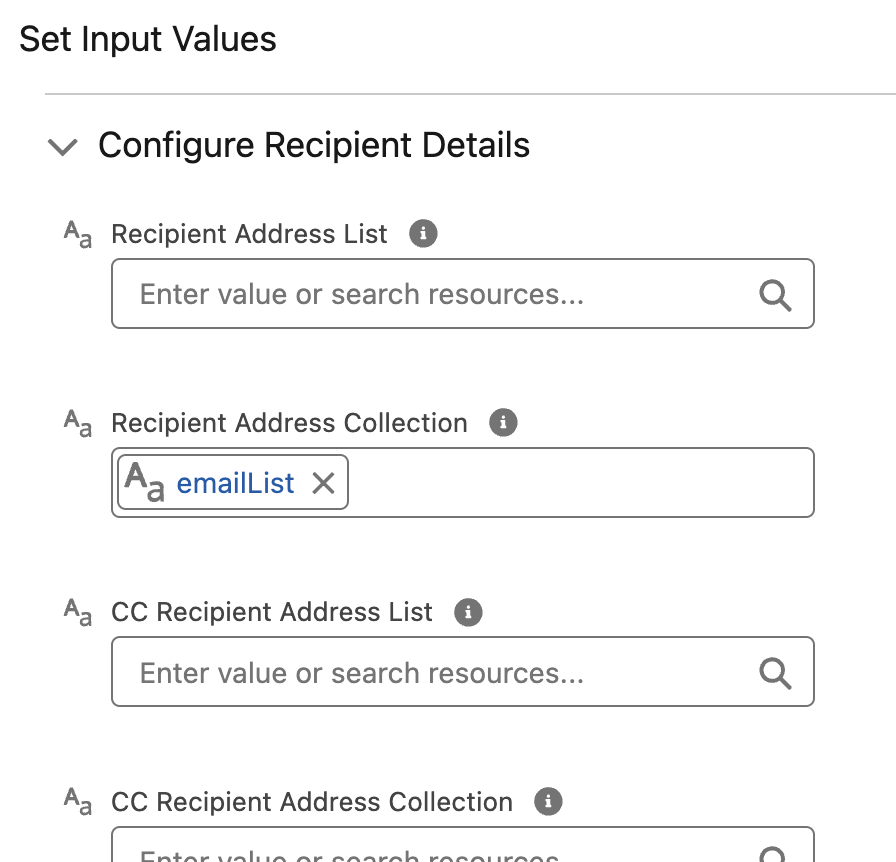
Screen -> Email Template Preview -> Edit Generated Email(the AI-generated, user-edited email). - Recipient Address Collection: This field requires a list of recipient email addresses, which must be gathered into a single text variable. However, those email addresses have yet to be collected into a single variable to add them to this field. Let’s do that now.
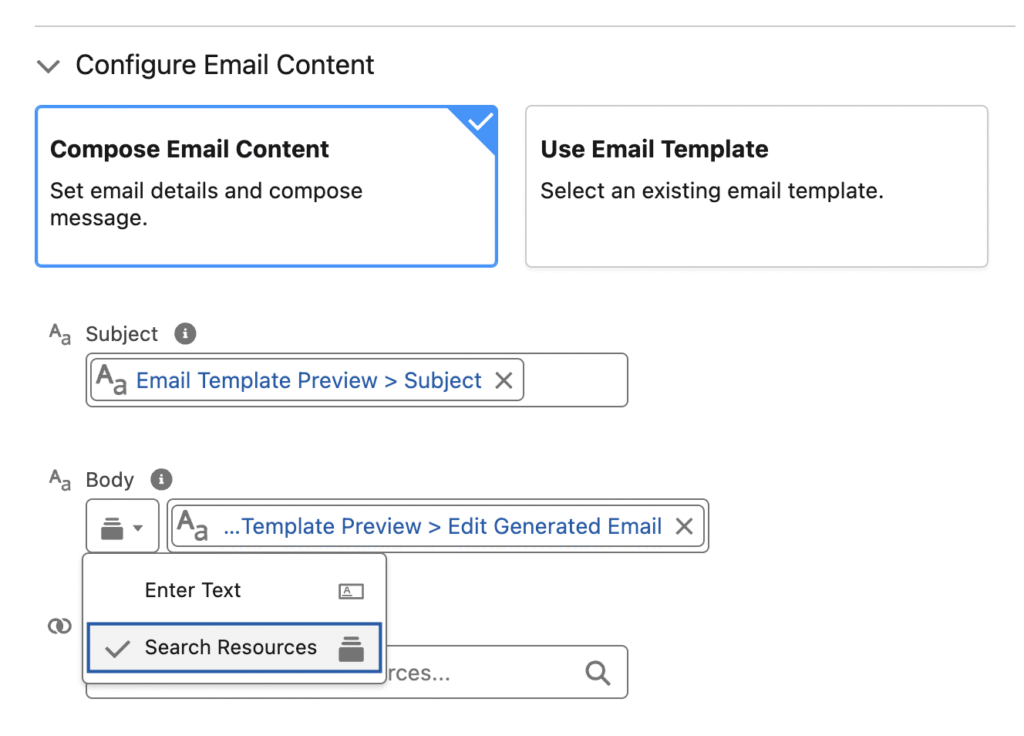
Caution With The Email Body Selector
Pay special attention to the Email Body Selector If you choose the wrong option you’re resulting email will have html code in it because the editor in the send email action supports rich text which displays html characters. See this issue? Check that you’re using the Search Resources option!
Step 6a: Collecting Email Addresses
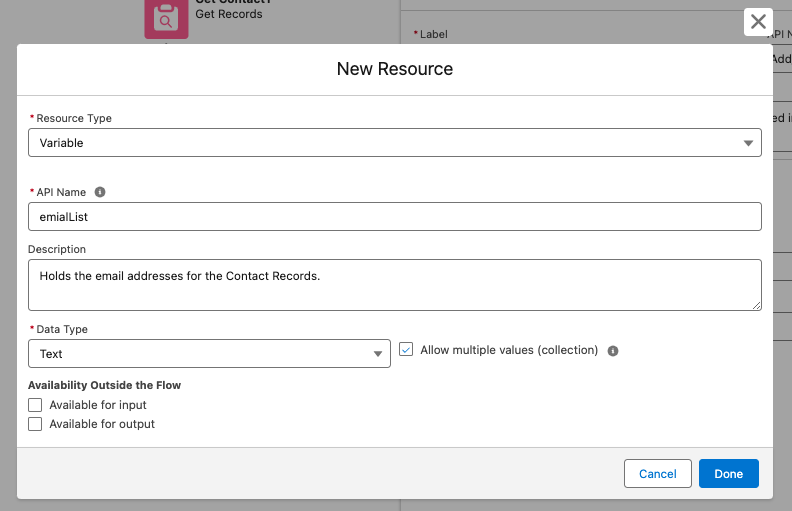
This step is not included in the build-along video. Since we’re sending to multiple email addresses at once, we need to manually gather the recipient email addresses into a single text variable so they can be passed into the Recipient Address Collection field.
Step 1: Create a New Resource for Email Addresses
- Create a new Text Variable that can hold multiple values (a collection).
- Name it
EmailList.
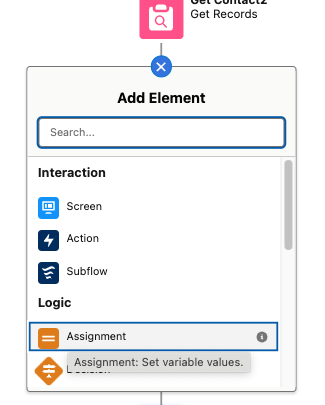
Step 2: Add an Assignment Element to Store Email Addresses
- Add an Assignment element right after the
Get Recordselements.
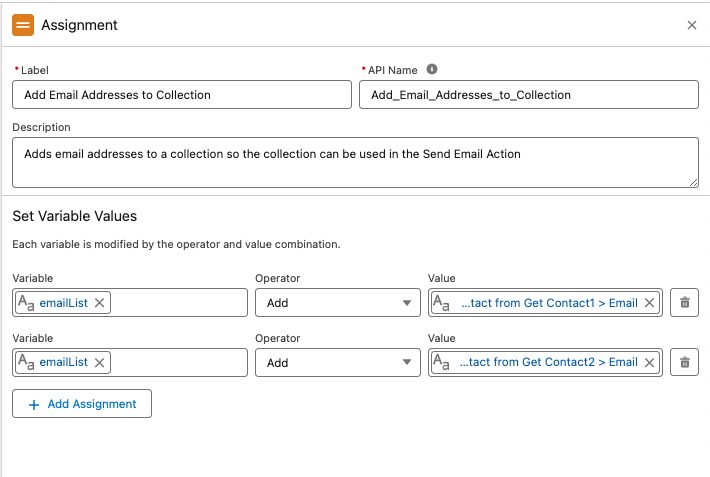
Step 3: Assign Email Addresses to the Collection
- Label the Assignment element as
Add Email Addresses to Collection. - Add the two contact email addresses to the
EmailListvariable. - Use the Add operator to ensure both emails are stored in the collection.
Step 4: Update the Send Email Action
- Return to the Send Email action element.
- In the
Recipient Address Collectionfield, make sure the newly createdEmailListresource is populated.
Step 7: Additional Testing
Before finalizing the flow, let’s test its functionality and verify that emails are sent correctly.
Debugging the Flow
- Click Debug in Flow Builder.
- Ensure logs confirm that the contact email addresses are successfully added to the
EmailListvariable. - Verify that the AI-generated email is properly sent.
- Check for any errors and resolve them if necessary.
Once everything is working as expected, click Activate to make the flow live. This is your final layout!
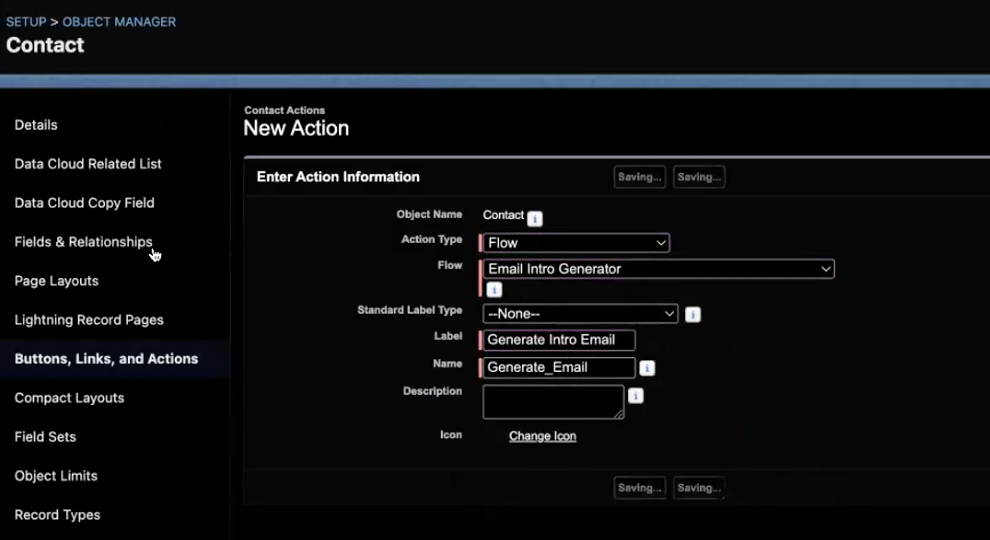
Adding the Flow to the Contact Page
Now that the flow is complete, we need to add it to the Contact Record Page for easy access.
Step 1: Create a New Action
- Navigate to a Contact Record Page.
- Go to Setup and click Edit Object.
- Click to add a New Action.
- Complete the necessary details and select the newly created flow.
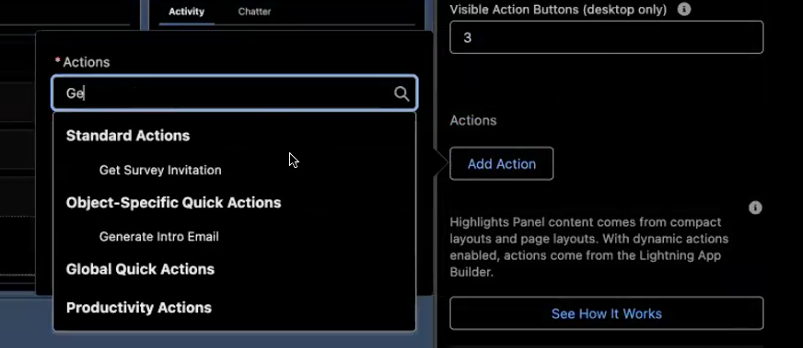
Step 2: Edit the Contact Page Layout
- Go back to the Contact Record Page and enter Setup.
- Click Edit Page (opens in Lightning App Builder).
- Upgrade to Dynamic Actions and select Start From Scratch if prompted.
- Use the Add Action button to search for and select the Generate Intro Email action.
Step 3: Save, Activate, and Test
- Click Save & Activate.
- If prompted, assign the page as the Org Default and save again.
- Return to the Contact Record Page.
- Test the new screen flow by clicking the Generate Intro Email button.
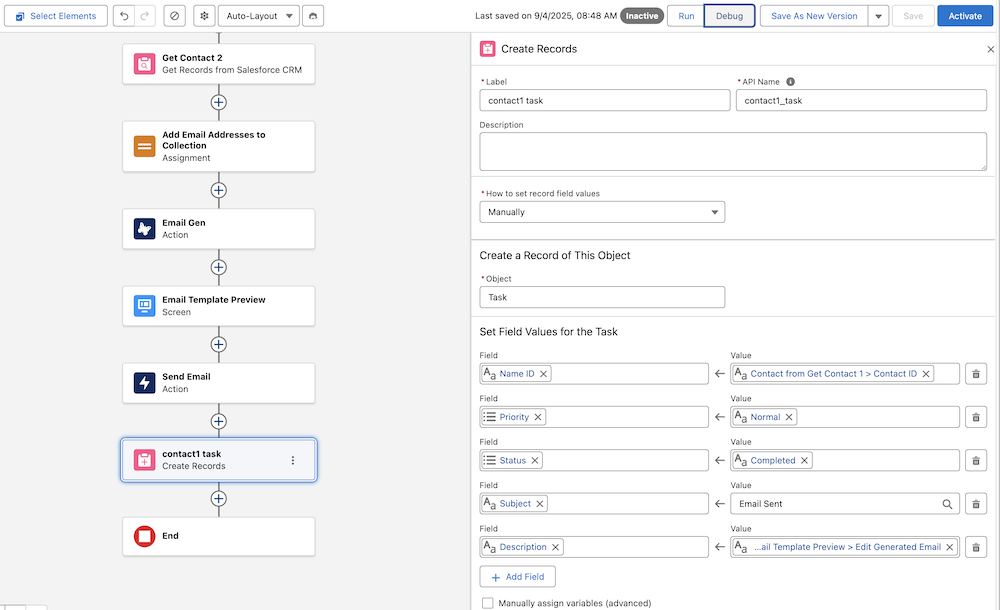
What about the Activity Record for the Email?
You might have noticed we didn’t use the Log Email on Send option in our send email action. This option records a record of the email sent for the recipient identified in the Recipient ID field. However because we are email multiple addresses at once we cannot use that field.
So what if you still wanted a record of the email sent logged to the Contact record?
You can add a Create Records element at the end of your flow to create a Task record that will show on the activity timeline to mimic the log email functionality. Create a Task for each Contact. Placing the body of the email in the Task Description makes it easy for user’s to quickly see the email similar to the typical Email Activity timeline.
The following configuration achieves this objective.
You made it! Congrats on building a more complex solution using flex prompt template inside a flow to solve for the business requirement!